Buildkite Test Agent Setup
We are using Buildkite for Windows and macOS testing. The build machines and buildkite-agent must be set up before use.
Windows Test Agent Setup
- Create the user “testbot” on the machine. Use the password for
ddevtestbot@gmail.com, available in 1Password. - In admin PowerShell,
wsl --install. - In admin PowerShell,
Set-ExecutionPolicy -Scope "CurrentUser" -ExecutionPolicy "RemoteSigned". - In admin PowerShell, download and run windows_buildkite_start.ps1 with
curl <url> -O windows_buildkite_start.ps1. - After restart, in administrative Git Bash window,
Rename-Computer <testbot-win10(home|pro)-<description>-1and thenexport BUILDKITE_AGENT_TOKEN=<token>. - Now download and run
windows_buildkite-testmachine_setup.sh. - Download and run windows_postinstall.sh.
- Launch Docker. It may require you to take further actions.
- Log into Chrome with the user
ddevtestbot@gmail.comand enable Chrome Remote Desktop. - Enable gd, fileinfo, and curl extensions in
/c/tools/php*/php.ini. - If a laptop, set the “lid closing” setting to do nothing.
- Set the “Sleep after time” setting in settings to never.
- Install winaero tweaker and “Enable user autologin checkbox”. Set up the machine to automatically log in on boot. Then run netplwiz, provide the password for the main user, uncheck “require a password to log in”.
- Set the
buildkite-agentservice to run as the testbot user and use delayed start: Choose “Automatic, delayed start” and on the “Log On” tab in the services widget it must be set up to log in as the testbot user, so it inherits environment variables and home directory (and can access NFS, has testbot Git config, etc). git config --global --add safe.directory '*'.- Manually run
testbot_maintenance.sh,curl -sL -O https://raw.githubusercontent.com/ddev/ddev/master/.buildkite/testbot_maintenance.sh && bash testbot_maintenance.sh. - Run
.buildkite/sanetestbot.shto check your work. - Reboot the machine and do a test run. (On Windows, the machine name only takes effect on reboot.)
- Verify that
go,ddev,git-bashare in the path. - In “Advanced Windows Update Settings” enable “Receive updates for other Microsoft products” to make sure you get WSL2 kernel upgrades. Make sure to run Windows Update to get the latest kernel.
Additional Windows Setup for WSL2+Docker Desktop Testing
- The Ubuntu distro should be set up with the user
buildkite-agent buildkite-agentshould have home directory/var/lib/buildkite-agent:sudo usermod -d /var/lib/buildkite-agent buildkite-agent- Configure buildkite agent in /etc/buildkite-agent:
- tags=”os=wsl2,architecture=amd64,dockertype=wsl2”
- token=”xxx”
wsl.exe --update- Open WSL2 and check out ddev/ddev.
- Install DDEV using the standard WSL2 Docker Desktop installation.
-
Delete the CAROOT and WSLENV environment variables from administrative PowerShell:
-
Configure brew in PATH with:
-
As root user, add sudo capability with
echo "ALL ALL=NOPASSWD: ALL" >/etc/sudoers.d/all && chmod 440 /etc/sudoers.d/all. - Manually run
testbot_maintenance.sh,.buildkite/testbot_maintenance.sh. git config --global --add safe.directory '*'-
Install basics in WSL2:
curl -fsSL https://pkg.ddev.com/apt/gpg.key | gpg --dearmor | sudo tee /etc/apt/keyrings/ddev.gpg > /dev/null echo "deb [signed-by=/etc/apt/keyrings/ddev.gpg] https://pkg.ddev.com/apt/ * *" | sudo tee /etc/apt/sources.list.d/ddev.list >/dev/null # Update package information and install DDEV sudo apt update && sudo apt install -y build-essential ddev icinga2 mariadb-client brew install docker-compose golang sudo mkdir -p /usr/sharekeyrings && curl -fsSL https://keys.openpgp.org/vks/v1/by-fingerprint/32A37959C2FA5C3C99EFBC32A79206696452D198 | sudo gpg --dearmor -o /usr/share/keyrings/buildkite-agent-archive-keyring.gpg echo "deb [signed-by=/usr/share/keyrings/buildkite-agent-archive-keyring.gpg] https://apt.buildkite.com/buildkite-agent stable main" | sudo tee /etc/apt/sources.list.d/buildkite-agent.list sudo apt update && sudo apt install -y build-essential buildkite-agent ca-certificates curl ddev etckeeper gnupg icinga2 nagios-plugins lsb-release make mariadb-client (mkcert -uninstall || true); rm -rf $(mkcert -CAROOT) || true; mkcert -install sudo snap install --classic go sudo snap install ngrok sudo systemctl enable buildkite-agent && sudo systemctl start buildkite-agent -
Verify that
buildkite-agentis running. - Follow the Icinga instructions to configure the agent. Under the “Agent” tab it provides a script to configure the agent.
- Windows Terminal should be installed. Set “Ubuntu” as the default and have it start on Windows startup.
echo "capath=/etc/ssl/certs/" >>~/.curlrcnc.exe -L -p 9003on Windows to trigger and allow Windows Defender.- Run
ngrok config add-authtoken <token>with token for free account.
Additional Windows Setup for WSL2+Docker-Inside Testing
- Uninstall Docker Desktop.
- Remove all of the entries (especially
host.docker.internal) that Docker Desktop might have added inC:\Windows\system32\drivers\etc\hosts. -
Install Docker and basics in WSL2:
sudo mkdir -p /etc/apt/keyrings sudo mkdir -p /etc/apt/keyrings && sudo rm -f /etc/apt/keyrings/docker.gpg && curl -fsSL https://download.docker.com/linux/ubuntu/gpg | sudo gpg --dearmor -o /etc/apt/keyrings/docker.gpg echo "deb [arch=$(dpkg --print-architecture) signed-by=/etc/apt/keyrings/docker.gpg] https://download.docker.com/linux/ubuntu $(lsb_release -cs) stable" | sudo tee /etc/apt/sources.list.d/docker.list > /dev/null sudo apt update && sudo apt install -y docker-ce docker-ce-cli etckeeper containerd.io docker-compose-plugin sudo usermod -aG docker $USER -
Run
.buildkite/sanetestbot.sh
Icinga2 monitoring setup for WSL2 instances
- Icinga Director web UI, configure the host on
newmonitor.thefays.us, normally making a copy of an existing identical item. - Deploy the new host using Icinga Director.
- On the WSL2 Ubuntu instance, install needed packages:
sudo apt update && sudo apt install -y etckeeper icinga2 monitoring-plugins-contrib nagios-plugins - Add
nagiosto thedockergroup in/etc/group. sudo icinga2 node wizardto configure the agent, see docs- Restart
sudo systemctl restart icinga2 - Hope that it can all work sometime.
macOS Docker Desktop Test Agent Setup (Intel and Apple Silicon)
- Create the user “testbot” on the machine. Use the password for
ddevtestbot@gmail.com, available in 1Password. - Change the name of the machine to something in keeping with current style, perhaps
testbot-macos-arm64-8. This is done in Settings → General → About → Name and in Sharing → Computer Name and in Sharing → Local Hostname. - Download and install Chrome and log the browser into the account used for test runners. It will pick up the Chrome Remote Desktop setup as a result. Configure Chrome Remote Desktop to serve. When this is done, the machine will be available for remote access and most other tasks can be done using Chrome Remote Desktop.
- The machine should be on the correct network and have a static IP handed out by DHCP. IP addresses are listed in /etc/hosts on
pi.ddev.site, so this one should be added. - Power should be set up as in
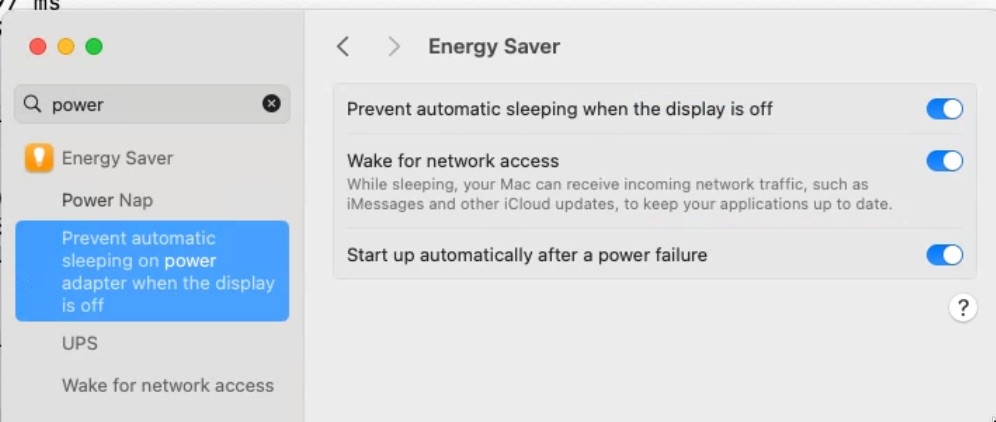 .
. - Auto login should be set up as in
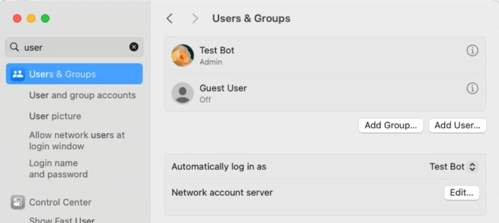 , see automatically log in on boot.
 - Remote login should be enabled as in
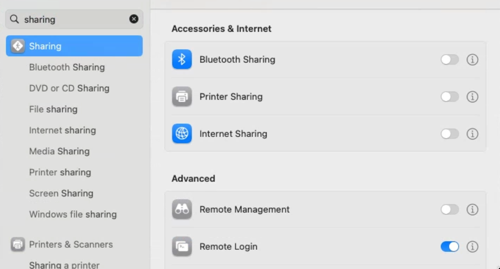 .
. - Automatic updates should be set to mostly security only as in
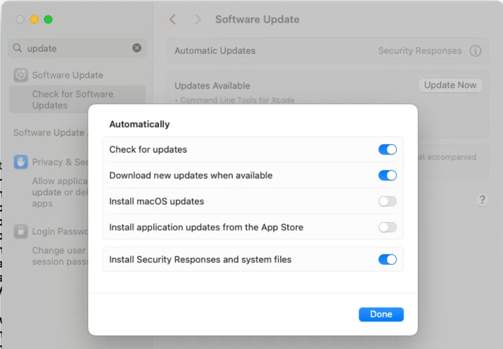 .
. - Set the time zone to US MT (nearest city: Denver, Colorado).
sudo mkdir -p /usr/local/bin && sudo chown -R testbot /usr/local/bin- Install Homebrew
/bin/bash -c "$(curl -fsSL https://raw.githubusercontent.com/Homebrew/install/HEAD/install.sh)" - After installing Homebrew follow the instructions it gives you at the end to add brew to your PATH.
- Install everything you’ll need with
brew install buildkite/buildkite/buildkite-agent bats-core composer ddev/ddev/ddev git golang jq mariadb mkcert netcat p7zip && brew install --cask docker iterm2 ngrok. - Run
ngrok authtoken <token>with token for free account from 1Password. - Run
mkcert -install. - If Docker Desktop will be deployed, run Docker manually and go through its configuration routine.
- If OrbStack will be deployed, install it from orbstack.dev.
- Install with Docker only.
- Click “Sign in” in the lower left to sign in with OrbStack credentials (normal test runner gmail address; it will receive an email with a login code).
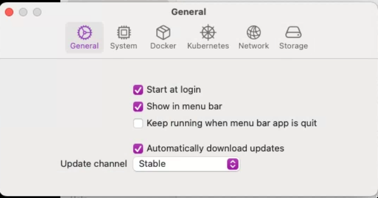
- Configure it to automatically start and download updates, see
 .
.
- If Rancher Desktop will be deployed, install it.
- Turn off kubernetes.
- Run iTerm. You may need to allow full disk access permissions.
- Run
mkdir ~/workspace && cd ~/workspace && git clone https://github.com/ddev/ddev. - Set up
nfsdby runningbash ~/workspace/ddev/scripts/macos_ddev_nfs_setup.sh. git config --global --add safe.directory '*'.- Edit
/usr/local/etc/buildkite-agent/buildkite-agent.cfgor/opt/homebrew/etc/buildkite-agent/buildkite-agent.cfgto add- the agent
token(from agents tab, “Reveal Agent Token”). - the agent
name(the name of the machine). tags, like"os=macos,architecture=arm64,osvariant=sonoma,dockertype=dockerformac,rancher-desktop=true,orbstack=true,docker-desktop=true"build-path="~/tmp/buildkite-agent/builds"
- the agent
- Run
brew services start buildkite-agent. - Run
bash ~/workspace/ddev/.buildkite/testbot_maintenance.sh. - Run
bash ~/workspace/ddev/.buildkite/sanetestbot.shto check your work. - The
testbotuser’s ssh account is used for monitoring, sossh-keygenand then add the public keyid_testbotfrom 1Password to~/.ssh/authorized_keysandchmod 600 ~/.ssh/authorized_keys. - Add the new machine to Icinga by copying an existing Icinga service to the new one. This is done in Icinga Director → Services → Single Services → Select a Service → Clone → Deploy. The new service has to have
by-ssh-addressset to the name of the test runner, and that address needs to be added topi.ddev.site’s/etc/hostsfile. -
If
zshis the shell configured, add/etc/zshenvso that/usr/local/bin/dockerwill be picked up:
Additional Colima macOS setup
brew install colimacolima start --cpu 4 --memory 6 --disk 100 --vm-type=qemu --mount-type=sshfs --dns=1.1.1.1colima stopcolima start vz --cpu 4 --memory 6 --disk 60 --vm-type=vz --mount-type=virtiofs --dns=1.1.1.1colima stop vz
Then the Buildkite agent must be configured with tags colima=true and colima_vz=true.
Additional Lima macOS setup (not yet working)
limactl create --name=lima-vz --vm-type=vz --mount-type=virtiofs --mount="~/:w" --memory=6 --cpus=4 --disk=100 template://dockerlimactl start lima-vzdocker context use lima-lima-vz
Then the Buildkite agent must be configured with tags lima=true.